Angello-Lite + RequireJS
Angello Lite + RequireJS

시작하며
AngularJS 를 공부할 때, 많이들 접하는 서적이 ‘Angular in Action’ 일 것입니다. 이 책에서는 Trello라는 일감 관리 웹앱을 angularJS로 구현하는 실습을 통해서 AngularJS를 공부하도록 유도하고 있는데요.(책 홍보하는거 같네요…)
이번 포스팅에서는 본격적인 Angello 구현에 앞서 가벼운 Angello 버전인 Angello-Lite에 RequireJS를 입혀보았습니다.
책에서는 app.js라는 파일 하나에 모든 기능을 모아 놓고 있어 이것을 분리해보는(모듈화) 것도 좋은 학습 방법이라 생각해서 RequireJS를 통해서 모듈화를 해보았고 그 내용을 포스팅을 통해 정리 해보려합니다. (깃주소에서 샘플코드를 보실 수 있습니다.)
먼저 이번 샘플코드에서는 라이브러리 관리를 위해서 npm을 이용해 보았습니다.
// package.json
{
  "name": "git_angular",
  "version": "1.0.0",
  "description": "You'll need [`git`](http://git-scm.com/) and a web browser.",
  "main": "app.js",
  "scripts": {
    "test": "echo \"Error: no test specified\" && exit 1"
  },
  "repository": {
    "type": "git",
    "url": "git+https://github.com/angularjs-in-action/angello-lite.git"
  },
  "author": "",
  "license": "ISC",
  "bugs": {
    "url": "https://github.com/angularjs-in-action/angello-lite/issues"
  },
  "homepage": "https://github.com/angularjs-in-action/angello-lite#readme",
  "dependencies": {
    "angular": "^1.5.8",
    "bootstrap": "^3.3.7",
    "jquery": "^3.1.1",
    "requirejs": "^2.3.2"
  }
}
위의 package.json 파일을 보면 dependencies에 사용할 라이브러리 들을 정의했습니다. 샘플 코드를 클론하시고 npm install 해주시면 필요한 라이브러리들을 받고 index.html 파일을 브라우저에서 열어주시면 샘플코드를 실행햅 보실 수 있습니다. (이번 예제에서는 서버딴 작업은 하지 않고 메모리에 데이터를 저장하도록 했습니다.)
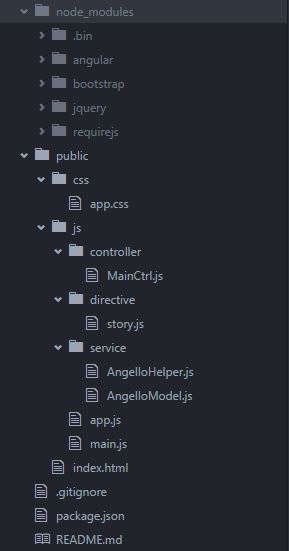
프로젝트 구조

node_modules : 프론트앤드 라이브러리들
public/css : css 파일
public/js/app.js : angular module
public/js/main.js : requireJS 시작점
public/controller : angular controller
public/directive : angular directive
public service : angular service
먼저 본격적으로 샘플코드를 살펴보기 전에 프로젝트의 전반적인 구조를 살펴보면 위와 같은 구조로 되어있습니다. (이번 포스팅은 RequireJS에 초점을 두어 작성을 하기 때문에, 기본적인 angularJS에 대해서는 이번 포스팅에서는 설명은 생략하도록 하겠습니다.)
RequireJS의 진입점
<!--index.html -->

<script data-main="js/main" src="../node_modules/requirejs/require.js"></script>
index.html 파일에 위와 같이 requireJS의 진입점을 설정해 주었습니다.
// main.js
require.config ({
    baseUrl : 'js',
    paths : {
  		'jquery': '../../node_modules/jquery/dist/jquery',
  		'angular': '../../node_modules/angular/angular',
    },
    shim:{
		'angular':{
			deps:['jquery'],
			exports:'angular'
		}
	}
});

require(['angular', 'app',
          'controller/MainCtrl',
          'directive/story'],
          function (angular, MyModule,
                    MainCtrl,
                    story
                    ) {
  $(document).ready(function () {
    angular.bootstrap(document, ['Angello']);

  });
});
main.js 에서는 위와 같이 config 설정을 통해서 baseUrl을 지정하고 jquery와 angularJS의 path는 따로 설정해 주었습니다.
그리고 동적으로 ng-app을 설정 해 주어야 했기 때문에 angular.bootstrap을 이용해서 ng-app 설정을 해주었습니다.
Angular Module 정의
그럼 ng-app으로 사용할 angular module을 살펴봐야 할 것 같습니다. public/js/app.js에 angular module을 정의했는데요 코드를 보면 아래와 같이 define 메소드를 통해서 정의를 했습니다.
//app.js
'use strict';

define (['angular'],
  function (angular) {

  var myModule = angular.module('Angello', []);

  return myModule;
});
정의한 모듈을 return 하여 다른 모듈 (controller, service 등)에서 사용할 수 있도록 정의했습니다.
위에 코드에서 보시는것 처럼 angular module을 정의하였고 정의한 모듈을 return해주어 다른 모듈에서 사용할 수 있도록 하였습니다.
그럼 이어서 정의한 모듈을 controller나 service, directive에서 어떻게 사용하고 있는지 살펴보겠습니다.
Anguler Service 정의
먼저 service를 정의한 코드를 살펴 보겠습니다. Angello-Lite에서는 Model과 Helper라는 두개의 서비스가 구현되어 있습니다. (Angello-Lite 부터 먼저 보시고 이 포스팅을 보시면 좀 더 이해가 수월하실 것 같습니다.)
// AngelloModel.js
'use strict';

define (function () {
  var AngelloModel = function() {
      var service = this,
          statuses = [
              {name: 'Back Log'},
              {name: 'To Do'},
              {name: 'In Progress'},
              {name: 'Code Review'},
              {name: 'QA Review'},
              {name: 'Verified'},
              {name: 'Done'}
          ],
          types = [
              {name: 'Feature'},
              {name: 'Enhancement'},
              {name: 'Bug'},
              {name: 'Spike'}
          ],
          stories = [
              {
                  title: 'First story',
                  description: 'Our first story.',
                  criteria: 'Criteria pending.',
                  status: 'To Do',
                  type: 'Feature',
                  reporter: 'Lukas Ruebbelke',
                  assignee: 'Brian Ford'
              },
              {
                  title: 'Second story',
                  description: 'Do something.',
                  criteria: 'Criteria pending.',
                  status: 'Back Log',
                  type: 'Feature',
                  reporter: 'Lukas Ruebbelke',
                  assignee: 'Brian Ford'
              },
              {
                  title: 'Another story',
                  description: 'Just one more.',
                  criteria: 'Criteria pending.',
                  status: 'Code Review',
                  type: 'Enhancement',
                  reporter: 'Lukas Ruebbelke',
                  assignee: 'Brian Ford'
              }
          ];

      service.getStatuses = function () {
          return statuses;
      };

      service.getTypes = function () {
          return types;
      };

      service.getStories = function () {
          return stories;
      };
    }

    return AngelloModel;
});
// AngelloHelper.js
'use strict';

define(function () {
  var AngelloHelper = function() {
      var buildIndex = function (source, property) {
          var tempArray = [];

          for (var i = 0, len = source.length; i < len; ++i) {
              tempArray[source[i][property]] = source[i];
          }

          return tempArray;
      };

      return {
          buildIndex: buildIndex
      };
  };

  return AngelloHelper;
});
위의 두개의 모델 코드를 보시면 역시 정의한 모듈을 return 해주고 있습니다. 그 이유는 서비스들을 MainCtrl.js에서 사용할 것이기 때문입니다.
MainCtrl 정의
// MainCtrl.js
'use strict';

define(['app',
      'service/AngelloHelper', 'service/AngelloModel'],
      function (myModule,
                AngelloHelper, AngelloModel) {
  var MainCtrl = function(AngelloModel, AngelloHelper) {
      var main = this;

      main.types = AngelloModel.getTypes();
      main.statuses = AngelloModel.getStatuses();
      main.stories = AngelloModel.getStories();
      main.typesIndex = AngelloHelper.buildIndex(main.types, 'name');
      main.statusesIndex = AngelloHelper.buildIndex(main.statuses, 'name');

      main.setCurrentStory = function (story) {
          main.currentStory = story;
          main.currentStatus = main.statusesIndex[story.status];
          main.currentType = main.typesIndex[story.type];
      };

      main.createStory = function() {
          main.stories.push({
              title: 'New Story',
              description: 'Description pending.',
              criteria: 'Criteria pending.',
              status: 'Back Log',
              type: 'Feature',
              reporter: 'Pending',
              assignee: 'Pending'
          });
      };

      main.setCurrentStatus = function (status) {
          if (typeof main.currentStory !== 'undefined') {
              main.currentStory.status = status.name;
          }
      };

      main.setCurrentType = function (type) {
          if (typeof main.currentStory !== 'undefined') {
              main.currentStory.type = type.name;
          }
      };
  };
  myModule.controller('MainCtrl', MainCtrl);
  myModule.service('AngelloModel', AngelloModel);
  myModule.factory('AngelloHelper', AngelloHelper)

});
MainCtrl.js 에서는 app.js(Anglar Module) 와 AngelloModel, AngelloHelper 서비스를 의존성 배열에 추가하고 있습니다.
MainCtrl.js 에서는 컨트롤러 역할을 수행하는 메소드들이 정의 되어있고 (angularJs 1.3 버전 이후로 생긴 controller-as 문법을 사용해 $scope는 보이지 않습니다.) 앞서 정의한 Angullar Module을 의존성에 추가해서 해당 모듈에 컨트롤러와 두개의 서비스를 추가해 주었습니다.
Directive 정의
마지막으로 Directive의 정의를 보겠습니다.
// story.js
'use strict';

define(['app'], function (myModule) {
  var story = function() {
      return {
          scope: true,
          replace: true,
          template: '<div><h4></h4><p></p></div>'
      }
  };

  myModule.directive('story', story);
});
story.js (Directive) 에서는 angular module(app.js)를 의존성에 추가해서 모듈에 직접 directive를 추가해 주었습니다.
마치며
Angello-Lite 버전과 requireJS를 적용한 코드를 비교해 보면 모듈화의 이점이 좀 더 명확히 보일 것 입니다.
index.html 파일에 하는 부분이 requireJS를 불러오는 것을 제외하고는 없는 것을 볼 수 있으실 텐데요. requireJS를 통해 의존성을 관리함으로써 필요한 부분에서 필요한 JS를 파일을 가져다 쓸 수 있게 된 것입니다.
좀 더 가독성도 좋아졌으며 어떤 모듈(JS파일)이 어디에 종속되는지 파악이 훨씬 편리해졌습니다.
이번 포스팅에서는 간단한 AngularJS 예제를 통해서 모듈화를 적용해 봤는데요. 다음 포스팅때는 진짜 Angello 버전에 requireJS를 적용하고 nodeJS를 이용해 실제 서버도 구현하여 완벽한 웹 어플리케이션을 구현하여 포스팅 할 수 있도록 하겠습니다.
